|
PREPARATION
- Parts Trimming
|
|
1.
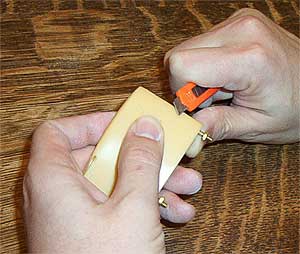
Before actual assembly begins, care should be taken to
trim up any access flash, or rough edges, on the
resin parts. This can be accomplished with an X-acto
knife. Gently whittle away any excess resin, making
sure that you don't damage the part itself. Take
your time and work with each part carefully. |
|
|
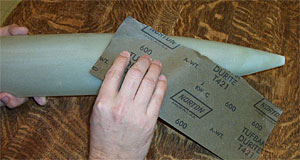
2. Once
the parts are trimmed, use 600 grit sandpaper and
sand the hull and the parts. This will provide the "tooth"
necessary for proper paint and glue adhesion.
IMPORTANT:
take care not to sand away any of the scribing or other
detail on the hull and/or parts. Sand enough to make
the surface uniformly dull. Resin parts can be sanded
further to provide a smooth finished appearance. |
|
|
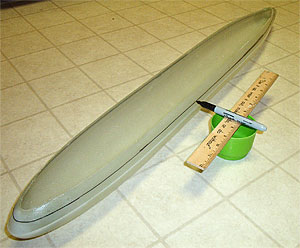
3.
Now is the time to trim the indexing lip. First, a cutting
line must be marked. Place the lower hull on a flat
surface and find a flat object on which you can place
a sharpie.
NOTE:
this object must be tall enough so that the point
of the sharpie touches the hull approximately a 1/2" above the boat's centerline. In this case
a small cup and ruler were used. Holding the hull steady,
slide the object with the sharpie around the hull, marking
a line on the indexing lip.
NOTE:
Trimming of the indexing lip on other Thor kits is not
required.
|
|
|
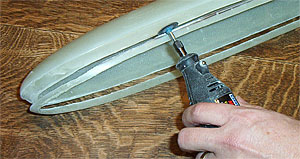
4.
Using a Dremel moto-tool with a cutoff wheel, cut
along the marked line and removed the excess material.
Use a file to knock down any rough edges along
the cut.
REMEMBER:
always use eye protection and a dust mask when using
the Dremel! And use the Dremel outdoors or in the
garage - the dust is very messy!
With
parts preparation completed it is now time to click
on the second item on the menu, Hull Assembly.
|
| |
Hull
Assembly |
|
|
Important
Safety Tip:
The
kit construction depicted on these pages was conducted
on the married builder's kitchen table as a visual metaphor
for the ease with which the ThorDesign Permit can
be built. Great
care was taken to ensure no damage was inflicted to the
construction area. Certain procedures were done outdoors.
The table was cleared and cleanup was meticulous following
each assembly step.
ThorDesign strongly recommends that every builder respect
their significant other's shared property in order to
ensure their, and our hobby's, continued health and growth. |
|