|
STERN
PLANES - Bearing Installation
|
|
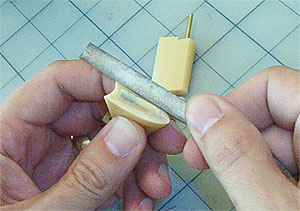
1.
First, apply a thin film of Vaseline to each stern plane
shaft to prevent gluing it to the bearings. Place the
bearings on the control shafts. Prepare a small batch
of 5 minute epoxy in a cup. Using a toothpick, place
a small drop of 5 minute epoxy on each bearing.
REMEMBER:
While 5 minute epoxy is not to be used for joining materials
to be exposed to water, because of its rapid drying
properties it can be used to tack pieces in place prior
to gluing with more suitable adhesives.
|
|
|
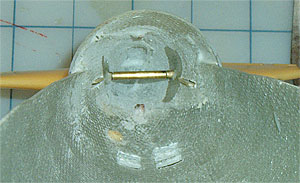
2.
Insert the stern planes into the hull. Be sure to use
the middle tubing piece to connect the stern plane control
shafts as shown at left.
|
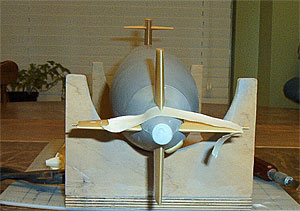 |
3.
Secure the stern planes in place with masking tape.
Use the horizontal hull seam, rudder trailing edge and
sail planes as sight guides to help ensure proper alignment.
Allow the 5 minute epoxy to cure completely.
|
|
|
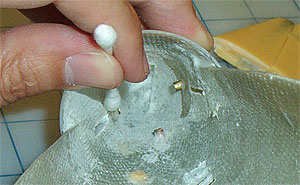
4.
Carefully remove the tape and planes. Mix a batch
of 2 hour cure epoxy and micro-balloons (see section
2 "Hull
Assembly" for
mixing instructions). Using a Q-tip, apply a bead of
epoxy/micro-balloons around each bearing. Be sure to
fill any gaps between the hull and bearing. Avoid getting
epoxy in the bearing itself.
NOTE:
It is best to reinstall the stern planes (don't forget
a thin film of Vaseline) and shaft connecting tubing
and re-tape to ensure accurate final alignment. Set
the hull aside and allow to cure overnight.
|
 |
5.
With the epoxy completely cured and the bearings bonded
firmly to the hull, a small flat file can be used to shape
any part of the bearing which is exposed above the hull
contour. |
 |
6.
Slip the stern planes and appendages in their respective
bearings/slots and check for fit and movement. The forward
appendage should rest snugly against the hull. Each
stern plane should freely move at least 30°
past the centerline both up and down. If either plane
is found to bind during movement (binding usually occurs
when passing center), use a small flat file and shape
it until the necessary freedom of travel is achieved.
NOTE:
setting up the stern plane control linkages will be
covered in section 7 "Linkages".
Next,
the stern plane appendages will be installed...
|
| |
Next
|
|
|
A
Suggestion
A
good time to pay a little attention to the hull seam
around the bearings and stern planes is prior to their
permanent installation. Use a file, sandpaper and putty
to smooth out this seam. Once the stern planes are bonded
to the hull it gets much harder to work on the area
with the planes in the way.
|
|